Overview
This article presents step-by-step instructions for creating a new bot using Bot Framework and side-loading it into Microsoft Teams for testing.
Let’s get started…
- Download the Bot Framework Visual Studio C# Bot project template using this link.
- Copy this zip file over to Documents\Visual Studio 2015\Templates\ProjectTemplates\Visual C# on your machine.
Create a new bot!
- In Visual, click on File -> New Project
- Select Bot Application and hit OK.

Time to wire it up!
Register your bot in Bot Framework and update your bot’s config
- Go to https://dev.botframework.com and select Register a bot, or simply click here.
- Fill out the Name, Bot handle, and Description.
- Leave Messaging endpoint blank for now. We’ll come back to this in a bit.
- Click on Create Microsoft App ID and password.
- In the new window that pops up, click on Generate an app password to continue.

- That will cause a popup to show on the site with your app’s password. Copy it to your clipboard.

- Now switch to the Visual Studio solution you created earlier and open the web.config file.
- Paste the password you copied into the value for MicrosoftAppPassword key.

- Now switch back to the window where you copied the password from and hit Finish and go back to Bot Framework.
- Now back on Bot Framework’s bot registration page, copy the value of Microsoft App ID and paste it into the value of MicrosoftAppId key in the web.config file in your project.
- Copy the value of Bot handle as well and paste it as the value of BotId key in the config file.

- Double-check that you copied the values for BotId, MicrosoftAppId, and MicrosoftAppPassword correctly.
- Now hit F5 to start Visual Studio with debugging on.
- Make note of the port number used in the browser that opens up.

- We are not done with registration in Bot Framework yet – we need to tell Bot Framework where to post messages meant for our bot. We will come back to that very soon.
Test your bot
- Download ngrok from here and extract the zip file.
- Launch Command Prompt and change into the directory where you extracted ngrok.
- Now this is where the port-number your site is running on comes in.
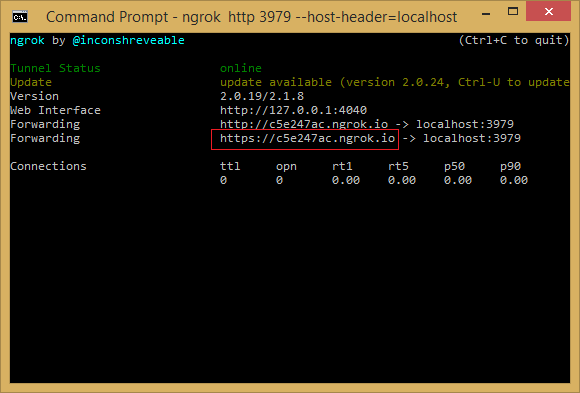
- Run the following command: ngrok http 3979 –host-header=localhost. Replace 3979 with whatever port number you saw earlier.
- This will start an ngrok tunnel. Copy its URL.

- Now, connect Bot Framework to this tunnel in the following manner:
- Go back to the Bot Framework registration page for the bot.
- Paste the following value for Messaging endpoint: <your_tunnel>/api/messages.
- In my case that is https://c5e247ac.ngrok.io/api/messages.
- Accept the Privacy statements, Terms of use, and Code of conduct (after you’ve read them, obviously) and click Register.
- Now click on the Test button under Test connection to your bot.
- You should see a successful POST /api/messages request received via your tunnel.
- That ensures that you have plugged everything in properly.
Test your bot inside Microsoft Teams
- Find “Microsoft Teams” under Add another channel and click on Add.

- In the window that pops up, ensure that the channel is On and tap on I’m done configuring Microsoft Teams.

- Now simply click on the Add to Teams button to side-load the bot into your Microsoft Teams and start a 1:1 chat with it.

- This would launch Microsoft Teams if you already have it installed and bring you into a chat with the bot. If you don’t have Microsoft Teams, continue to download it, sign-in, and click on Add to Teams again.

- Send a message to your bot and you’ll find that it responds with the number of characters in the string you sent. That’s the default logic in Bot project template.

- Congratulations! You’ve got your bot working.
What to do next?
- Understand how everything works: Set breakpoint in MessagesController.Post method and send a message to your bot via Microsoft Teams again and step through the code so you understand what’s happening.
- Fiddle with it: Try modifying the bot to return something else to the user – e.g. call https://api.chucknorris.io/ to reply with a random Chuck Norris joke.
- Read more: Read more about utilizing cards here and capabilities of Bot Framework SDK here.
- Windows Azure: Deploy your Bot to Windows Azure. Once that’s done, update the bot registration in Bot Framework to have the URL of your Windows Azure website or cloud-service (depending on what you chose).
Leave a comment